User Information
There are a number of program options which can be set from this window. When the User Preferences window is open, automatic updates are halted.
User Information
User Information
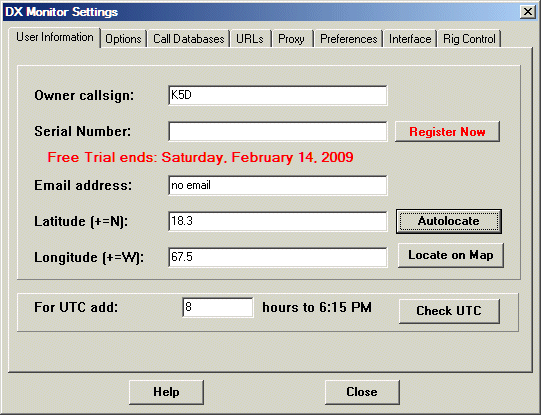
Owner Callsign. The callsign you used to register DX Monitor. If you use DX Monitor with multipe callsigns, you can register more than one using the web Registration Form. Select prepaid and type your original registered callsign in the comment box. You will receive a different serial number for each callsign.
Serial Number. You will receive your serial number by email after registering and paying for DX Monitor. If you have not registered, the program will cease to function at the end of the trial period. Press the Register button to go to the Registration Form.
Email Address: your email address. This will only be used to send you notifications of important problems with the program and announcements of major upgrades. Your email address will not be divulged to third parties and you will receive no other advertising from the author.
Latitude: North is +, south is -. Press the Autolocate button for an estimate based on the installed Callbook or the defaults based on your prefix.
Locate on Map. Use the VE3SUN Ham Locator Map to zoom in on your location to determine the exact latitude and longitude. In many cases, you can see your antennas in the satellite image. Even small antennas are visible. Please log your location on the VE3SUN Ham Locator Map so that we can update the database with exact locations for DX Monitor users. Copy and paste the latitude and longitude from the Ham Locator Map.
Longitude: West is +, east is -.
Your location will be used to calculate beam headings,
to create the Azimuthal (Great Circle) map and for distance calculations to the DX and
spotting stations.
For UTC add: adjustment to your computer clock for UTC. It should not be necessary to change this setting if you have your computer clock set up correctly.
Check UTC. Press this button to show the Internet Time Window which will show the correct UTC time.
Check DX Summit. Set the time between automatic updates from DX Summit and other sources. The exact time will be randomized so that all the DX Monitor users do not poll the summit simultaneously. If none of the Automatic Downloads items is checked in the Update Menu on the main window, no automatic downloading will occur.
Grid Shows Last. The main grid display will show up to the number of hours set in this option. If more spots arrive than the maximum in the program’s short term memory, the older spots will fall off the end of the main grid display. They will still be visible in the History Window.
Highlight Latest. DX Spots which have arrived in the past few minutes will be highlighted in the main grid and Band Map windows.
Local Spotter Range. The main grid and the Band Map have options for showing only those spots sent by spotters local to your location. Set the range here. The spotter location is determined from their prefix and callsign. If you have the RAC Callbook installed, US station locations will be retrieved from the Callbook. The data file regions.dat is a text file containing latitudes and longitudes for regions of countries (K1, K2, K3, etc). You can modify this file to add new regions, or move the center of a prefix region. If you enter a lot of new information about your country, please let me know so that the data can be included in a new regions.dat file.
Maximum History File Size. The history data is stored in a text file DXHistory.txt in the data subfolder of DX Monitor. This setting limits the size of the file to conserve disk space and avoid long delays on slower computers. One million records requires about 100 Megabytes of disk space and is not a problem for current computers running XP or W2K.
Telnet at Startup. If you always use a local telnet server, you can tell DX Monitor to start a telnet connection automatically every time the program is run. Select the server from the pull down menu and check the box shown. Press Test to open the Telnet Window now.
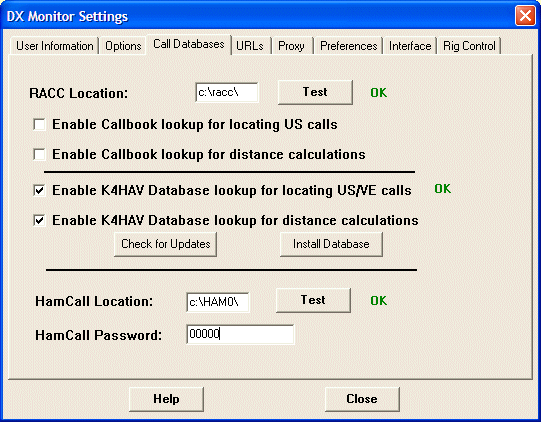
DX Monitor can access the RAC Callbook data on CD. Note that this is the Radio Amateur Callbook CD, not the QRZ CD and not the Buckmaster CD. The HamCall CD is supported. See below for settings.
Drive: Set the drive and folder of the Callbook data. Note that it is possible to copy the data to your hard drive which makes it possible to do location lookups at high speed. You will not want to use the Callbook for distance highlights from CD.
Test. After setting the drive information, press Test to check that the data is readable by DX Monitor. A green OK will appear if everything is working.
Enable Callbook lookup for locating US Calls. If checked, the callbook will be used to show the station information when a callsign is selected with a single click. This information appears in the popup menu and the status bar at the lower left of the main window.
Enable Callbook lookup for distance calculations. If checked, the callbook will be used to determine the distance from you to the spotter. If the spotter is local to you as determined by the setting on the Options tab above, that call will be highlighted in red and will show up when only local spots are shown if you have selected the Local Spotters option in the Main Window or the Band Map.
Enabled K4HAV Database Lookup for Locating US/VE Calls. Check this box to use the K4HAV FCC and VE Database for QSL and other information displayed in the Station Information Window. If the database is installed, the OK label will appear beside the check box. Click for Installation Information.
Enable K4HAV Database for Distance Calculations. If checked, the FCC/VE data will
be used to calculate distances to US and Canadian stations. This may slow down some
displays but provides more accuracy. If you are filtering by local spotter, the filter
will be much more accurate if this box is checked.
HamCall CD Location.
HamCall Password. The password that came with your HamCall CD for access to the latest updated information via the internet. The password must be assigned to the same call you have used as Owner of DX Monitor.
Use the F11 command to show the Station Information Window which will display the address and other available information about any selected callsign.
The URLs used to access the data. If any of the servers change their URL but keep the data format the same, it may be necessary to change the URL DX Monitor uses. That can be done easily from this page.
Double click on any URL shown to retrieve it with your web browser. This is a quick test to determine if the server is down, or to see the data in its raw form.
You can change these to automatically retrieve spots from DX Summit for specialized modes and bands if you are only interested in UHF or IOTA spots for example.
To restore the default URL, click the arrow on the right to open the pop down menu and select it.
If you are behind a Corporate firewall, it may be necessary to enter the parameters of your proxy server. If not, leave all items on this page blank. Proxy information can be obtained from your network administrator, or you can look it up in the settings used to configure your web browser.
Username. Some proxy servers require a username and password. If yours does not, this entry must be blank.
Password. This password will be saved in the DXMON.INI file in plain text. If you have a security concern, you have been warned. If anyone asks for it, I can probably add a simple encryption scheme to the entry.
Enable Proxy Server. When checked, DX Monitor sends requests via the proxy server. Otherwise, DX Monitor sends requests for pages directly.
Use Internet Explorer Setting. Pressing this button will ask Internet Explorer what proxy server it is using and fill in the blanks for the server and host. It may still be necessary to fill in the user name and password. It will also be necessary to Check the Enable Proxy box.
Some accelerators enable and disable the proxy regularly. At this point, DX Monitor will not follow the enabling and disabling automatically as I am not sure how many users this affects. If you would like this feature, let me know.
Dialup Acceleration. If your ISP has an accelerator available such as Slipstream or a similar service, you should enter the proxy information for accessing the accelerator proxy. The DX Summit and other pages accessed by DX Monitor can be highly compressed by the accelerator software resulting in very good download speeds even on slow dialup lines.
User Preferences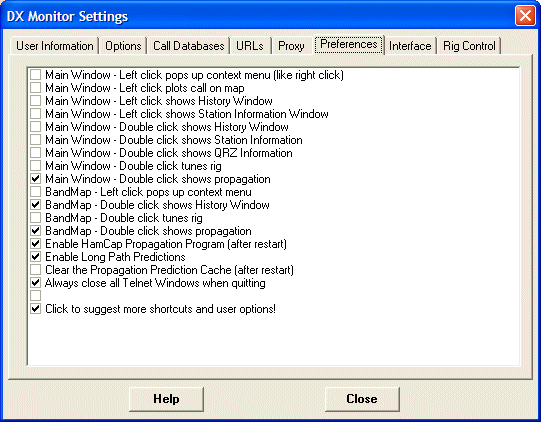
User Preferences
DX Monitor can be configured to suit the individual preferences of each user. This list allows you to choose what actions occur when a callsign is clicked or double-clicked.
Main Window - Left click Preferences. Enable the left mouse button to take several actions at once when a callsign is selected. Check the boxes for the desired options.
Main Window - Double click Preferences. Enable double click actions.
Main Window - Double click shows QRZ Information. If this option is selected, double clicking on a callsign will activate your default browser and access the QRZ online database.
Main Window - Double click shows Station Information Window. If checked, double-clicking on a callsign in the main window will pop up the Station Information Window containing the address, beam heading, sunrise/sunset times, county, state, and buttons to plot the station on the maps and look up QRZ, Hamcall, or Google information.
Main Window - Double click tunes rig. If checked, double-clicking on a callsign in the main window will tune the rig to the spot frequency if Omnirig is installed and configured.
Main Window - Double click shows Propagation. If checked, double-clicking on a callsign in the main window will show the Propagation Chart indicating propagation to that station.
Band Map - Left click pops up context menu. If checked, the left mouse button will bring up the context menu (the menu normally popped up by the right mouse button).
Band Map - Double Click shows History Window. If checked, double clicking on the band map will show the History Window.
Band Map - Double Click tunes rig. If checked, double-clicking on a callsign in the band map will tune the rig to the spot frequency if Omnirig is installed and configured.
Band Map - Double click shows Propagation. If checked, double-clicking on a callsign in the main window will show the Propagation Chart indicating propagation to that station.
Enable HamCap Propagation Program. If this box is checked, DX Monitor will initiate the HamCap program when DX Monitor starts up if it has been installed. Unchecking this box will skip this step which has caused DX Monitor to freeze on some systems due to a problem with Windows.
Enable Long Path Predictions. If this box is checked the propagation will be checked for both short and long path. If the signal is expected to be stronger on the long path, the beam heading will show the long path heading. If your system is slowed down by the VOACAP program operating too much in the background, turn off this option.
Clear the Propagation Prediction Cache. The propagation predictions are cached to save time when the same station appears again. Propagation predictions are cached for one calendar month. If you wish to recalculate the propagation predictions because your station has changed, you have moved location, or to use a different smoothed sunspot number in HamCap, clear the cache by checking this box and restarting DX Monitor.
Always close all Telnet Windows when quitting. If checked, DX Monitor will close all open Telnet Windows without asking when you quit DX Monitor.
Perform an automatic restart every 72 hours (except weekends). If checked, DX Monitor will shut itself down after 72 hours of continuous operation and restart. This is to force cleanup of the data files, delete excessive temporary files, and ensure that excessive memory is not being used. The program will restart after 5 seconds delay with the stored settings.
Suggestions Welcome. If you would like to enable a special shortcut in the program based on mouse clicks or shortcut key combinations, let me know and I will add it to the list of future enhancements to the program. Double click the suggestions line to browse to the web site feedback form.
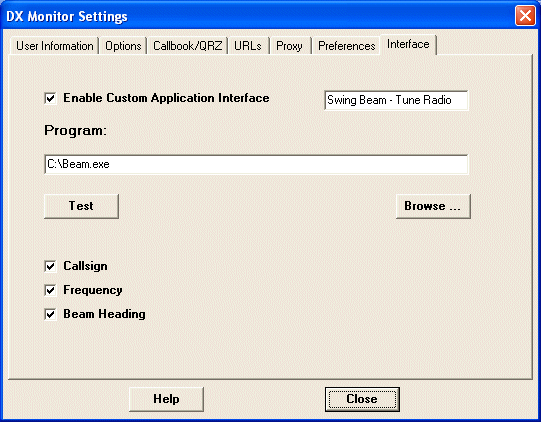
DX Monitor can run a user created application to perform custom tasks such as tuning the radio, turning the beam, or entering data into a logbook.
There are many ways to communicate between Windows programs, DDE, COM/OLE, Windows Messages, TCP/IP, etc. Programmers who use DX Monitor can create their own interface using a very small application that receives the command from DX Monitor and sends it to their own application using the interface of their choosing. This feature is new in version 0.997 and I look forward to hearing from users who want to expand this capability or provide applications for specific purposes such as beam control.
Enable Custom Application Interface. Checking this box enables or disables the interface. It is not necessary to enable the Custom Interface in order to use Omnirig rig control.
Menu Text. The text to add to the Main Window popup menu to invoke the user application. This will be added to the popup menus in the Band Map and History window later.
Path to Program. The full path to the user application. Use the Browse... button to find the user application to fill in this line.
Command Line Parameters. DX Monitor will append the parameters to the command line according to the checkboxes. In the example shown, DX Monitor will run the following program when you slect Swing Beam - Tune Radio from the Main Window popup menu:
“c:\Beam.exe VE3SUN 7005.0 14�”
A simple DOS application is included to demonstrate the interface. DXTEST.EXE is compiled from the source file DXTEST.C.
Another example of a custom application, which announces alerts with CW audio can be downloaded from ve3sun.com/files/CW.zip. Installation instructions are included in the Read Me file enclosed. When a station on your alert list is spotted, the callsign and frequency will be announced.
A further extension of this kind of interface would be to run a program when an alert occurs. The program could then send an email, an SMS message, make a phone call, or send an alert message over the internet.
Rig Control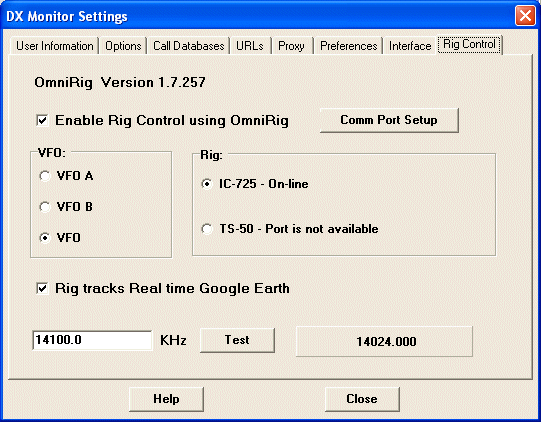
Rig Control Settings
OmniRig is a free application written by Alex Shovkopylas, VE3NEA, which can be used to control your rig. The latest version of OmniRig is available for download from www.dxatlas.com/omnirig. OmniRig is compatible with a number of logging programs and other useful software such as Faros.
If OmniRig is installed, the version and interface number will be shown at the top of the Rig Control window and the check box to enable rig control will be enabled. If OmniRig is not found, the rig control option will not work. If your rig does not show up in the list of available rigs, check the OmniRig web site for the latest rig description files. Unzip RigIni.zip and replace the ini files in c:\Program Files\Afreet\OmniRig\Rigs.
With OmniRig installed, double clicking on a frequency in the Main Window or Band Map will tune the receiver to the desired frequency if the double click preference is selected. There are Scanning Tools associated with the Band Map that can be used to automatically monitor the incoming DX spots.
If you have been using OmniRig with another application, the radios you have configured will automatically show up in the Rig box. Select the rig you wish DX Monitor to control.
Depending on the type of radio, you must select one of the VFO options. Some radios have separate VFO control, allowing you to use DX Monitor to set VFO B, while you are still operating on VFO A.
A test box allows you to check the settings. Enter a frequency in KHz and press Test to tune the radio. The new frequency should be displayed to the right of the Test Button.
If the Rig Tracks Real Time Google Earth box is checked, using the Google Earth screensaver option to view incoming spots on the Google Earth maps will cause the radio to follow the map as the new spots come in.
 If you have not used OmniRig before, it will be necessary to configure the interface port for your radio.
Click on the Comm Port Setup button to display the OmniRig configuration Window.
If you have not used OmniRig before, it will be necessary to configure the interface port for your radio.
Click on the Comm Port Setup button to display the OmniRig configuration Window.
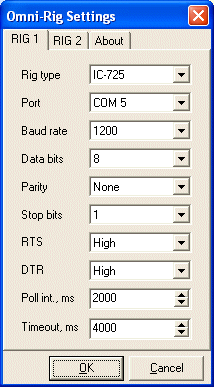
OmniRig can control two radios on two serial ports if you have them. Choose the rig type from the list of rigs.
The baud rate, data bits, parity and stop bits must match the way the radio is configured. Tested working configurations are shown in the Table of Tested OmniRig Configurations. Some radios can be configured via internal jumpers. Other radios can be configured with button settings. Your radio may not be in its default configuration, so it is necessary to make the control settings agree with the radio settings before the program can communicate with the radio. Check your radio manual for more information.
If you are using an interface powered by the serial port, such as the W1GEE interfaces, it is necessary to set RTS and/or DTR high to provide power to the interface. With some notebook computers, or with USB to serial cables, the voltage may not be adequate to supply the cable properly. In that case, you should use a powered interface.
The poll interval sets the time lapse between checks of the radio status. DX Monitor, unlike a logging program, does not use the radio information, so it is appropriate to set a long polling interval. Contest loggers would be better off with a short polling interval.
The timeout setting is used to trigger the radio not responding message.
Automatic control of most popular antenna rotators is made simple with the excellent PstRotator software for antenna rotators by YO3DMU. PstRotator is DX Monitor aware. Simply clicking on a callsign or a beam heading in the DX Monitor window will transfer the information to the PstRotator control program, ready to turn the rotator with a single click on GO.
To use PstRotator with DX Monitor, simply select DX Monitor from the Tracker menu and change the Mode to Tracking.