Window Menu and Telnet
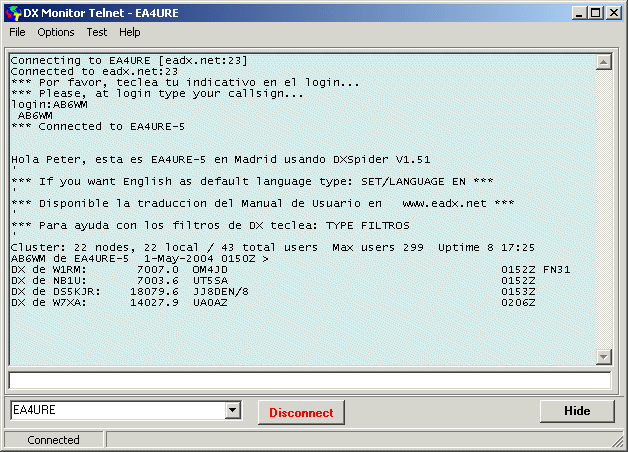
DX Monitor Telnet
Introduction
Telnet is an alternative source for DX spots to DX Summit. As there are hundreds of telnet servers around the world, if one goes down, you can switch to a different server as a source of DX information. Because spots arrive in “real time”, they are displayed immediately in the DX Monitor window. Your local packet cluster may also support telnet access, so you can connect with local DXers without the need for a VHF radio and packet hardware and software.
Many users like to connect to a local telnet server to see spots from nearby stations which may not be sent to the worldwide cluster network and to chat with local hams using the TALK command.
Installation
The Telnet Application for DX Monitor is a separate executable file, DXMTelnet.exe with a set of associated files: DXMTelent.ini contains the settings; TNServers.txt contains a list of available hosts; AutoResponse.txt contains the prompts and automatic replies that allow the telnet connection to function without the need for user input.
These files should all be present in the same folder as dxmon.exe, the DX Monitor main application and are
installed there automatically by the installation program.
Running DXMTelnet
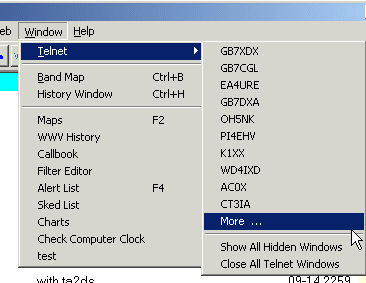
Normally, the telnet function is started from DX Monitor. Under the Window menu item, select Telnet and a submenu will appear. Choose one of the listed hosts, or select More ... to see the list of all Telnet servers.
Connected Telnet windows are indicated by a checkmark beside the server name. Clicking on the name, e.g. EA4URE will show the Telnet window if it is hidden.
Servers named in the menu, but without checkmarks are recent connections that are not connected now. Clicking on K1XX, for example, would open a new Telnet window and connect to K1XX.
| Tip: The first time you use Telnet, use the More ... menu command to see the complete list of servers. Choose one near you. The next time you open the menu, the list of servers will show the recent servers you used with the last one you connected to at the top. |
Show All
. This menu item will show all Telnet windows, bringing them from the system tray to normal size. If you have quit DX Monitor, but not the Telnet applications, and have then restarted DX Monitor, then Show All will reconnect DX Monitor to the Telnet windows so that spots are transferred to DX Monitor.Close all Telnet Windows
will force all the Telnet Windows to disconnect and close. If a Telnet Window is open when you exit DX Monitor, you will be asked if you wish to have the window closed or leave it open.
DXMTelnet.exe can also be run as a standalone application without DX Monitor. The host name can be included as a command line parameter. For example, a shortcut can be created on the desktop to run the Telnet application by right-clicking on the desktop, selecting New ... Shortcut and entering the following location:
"c:\Program Files\DX Monitor\DXMTelnet.exe" EA4URE
Name the new icon EA4URE. Double clicking the icon will run telnet and connect immediately to EA4URE. If DX Monitor is running, or started later, spots and announcements will be sent to DX Monitor.
Sending a DX Spot by Telnet
. Click on the spot button in the DX Monitor toolbar, or select Send DX Spot from the Tools menu. The form for sending a DX spot will appear. If you are connected to a Telnet server, a new button will appear between the Send button and the Cancel button. Send via Telnet to ... will show which server is the default server for sending DX Spots.Sending a WWV Announcement by Telnet
. Select Send a WWV Announcement from the Tools menu of DX Monitor. If you are connected to a Telnet server, you will be able to make a WWV announcement. If you are not connected to a Telnet server, the Send button will be disabled. Some Telnet servers only allow users who are registered with the owner to send WWV and other announcements.
The size and color of the Telnet Window will vary as these are user controlled.
You may open as many Telnet windows as you wish to connect to multiple telnet hosts.
In general, you may wish to choose a server that is local to you so that you can
chat with your friends and see local spots that may not be connected to DX Summit.
You may also want to connect with one or more of the busy servers that handle large
numbers of spots.
Connect/Disconnect Button
When disconnected, this button shows Connect. Pressing the button will start
an attempt to connect to the selected server.
When connected, it show Disconnect.
Pressing the button will send a BYE command to the host, wait 5 seconds, and then force a
disconnect if the host has not already disconnected.
SH/FDX
When you are connected to a Telnet Server, the SH/FDX button types the SH/FDX/100 command for you.
This command requests the last 100 DX spots on that server in the format recognized by DX Monitor.
The spots will transfer to the DX Monitor program. This command is handy when web servers are not
available to update the history and you wish to look at prior spots with DX Monitor.
Hide
The Hide button will hide the Telnet application in the system tray at the bottom right of your screen.
It will show as the DX Monitor icon with a yellow T for telnet. Moving the mouse over the icon will
show the host name if you are connected. Clicking on the icon will restore the window. When the window
is visible, you can use Alt-Tab to move from DX Monitor to the Telnet application and other applications.
When it is hidden, it does not appear on the list of applications available.
Select a Host Server
A Telnet host can be selected from the drop down list by clicking on the down arrow to the right of the entry box. The list is in order according to which hosts you last accessed. You can also type the name of the host you wish to connect to in the text box.
The detailed list of Telnet hosts is displayed by either double clicking on the selection box, right clicking on the selection box and choosing Show Server List, or choosing Show Telnet Server List from the Options menu.
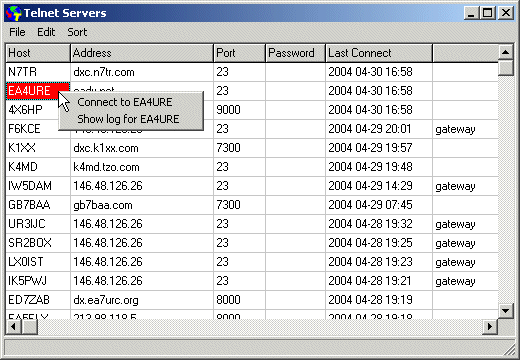
Server List Window
The list of available servers can be sorted by clicking on the panel title at the top of each list. Normally, the list is in order of most recent connection. When first starting DX Monitor Telnet, you will want to sort into order by callsign and then choose a host near you. Later, you are more likely to want to choose one of the servers you have used recently.
To choose a server, select it and press the right mouse button. Choose Connect from the popup menu.
The spreadsheet of servers can be edited by clicking on an entry and typing changes unless the page is locked by selecting Lock Editing from the Edit Menu. The columns contain the address of the server and the port number on which it listens. Some servers have multiple ports with the same address. If you want a different password for a particular server, enter it in the password column. Otherwise, the default password will be used. Note that many servers require you to type a password the first time you connect. Sometimes there is no way to change that password. Be careful. If the last attempt to connect failed, the last connect entry shows a hyphen in front of the date. That keeps failed hosts sorted to the bottom of the list.
New servers can be added to the list by typing ctl-N or selecting Add New Server from the Edit Menu. Servers which are no longer available can be deleted from the list with Shift-Del or by selecting Delete Server from the Edit Menu.
Multiple lists of servers can be maintained and loaded and saved through the File Menu. New servers can be added to the list with the Import ... menu item. There are many lists of Telnet Servers available on the web. Please let me know if you find some good lists in addition to these:
Setting up the Automatic Responses
In the main Telnet Window, select Edit Automatic Responses from the Options menu. If Enable Automatic Responses is checked in the Options menu, the program will automatically answer prompts from the Telnet Host.

Automatic Response Editor
When the host sends the string in the left column, the program will type back the response in the right column. Be careful how you select the character string for the prompt. Usually, including the : in the prompt string will reduce false sending of the response. Note that you may need multiple sets of prompts depending on the hosts you use. Special entries: %call% will fill in the callsign from the DX Monitor program registration.
You can specify one password for all the telnet connections by entering it in Automatic Response list, or use a different password for each server.
| Tip: If there is a password entered in the server list, it will be used instead of the default password on the Automatic Response page. |
File Menu
Clear Save As Close
Options Menu
Automatic Connect on Startup
This option is only useful if you are using DXMTelnet without DX Monitor. It will automatically
connect to the last host used.
Enable Automatic Reconnect
When this option is enabled, the program will automatically attempt to reconnect when the connection is dropped. This is very useful if you have frequent modem disconnects. If you disconnect by clicking the Disconnect button, or typing BYE, the program will not automatically reconnect.
Hide When Connected.
This option automatically hides the Telnet Window in the tray upon connecting. Do not use this option when trying new Telnet hosts. Use it in conjunction with automatic connection for hosts you have tested and configured.
Enable Automatic Responses
When enabled, the program will automatically type responses to prompts which match those
in the list of automatic responses.
Edit Automatic Responses
Shows the window which lets you edit the Automatic Response list as discussed above.
Show Telnet Server List
Displays the window with the Telnet server details. You can also show this list by double-clicking
on the host select box, or right clicking the host select box.
Log to File
If enabled, all of the text received will be saved to a file in the logs sub-folder. Each host
will have its own file of saved data.
Hide DX Spots
This option causes DX Spots to not be displayed in the Telnet Window. They are still sent to the
DX Monitor program. You will only see WWV announcements and talk messages from other users
of the cluster. This is handy for carrying on conversations with the others without being
distracted by DX spots.
Change Font
These options are also available by right-clicking on the window itself. You can choose your own font and color scheme. Normally, a font which displayed in fixed width looks better as it keeps the information aligned in columns. Lucida Console, Courier New, and Fixed Sys all work. The size and color of the font may also be changed.
Use ctl-C to copy text from the screen to another application. This is handy if a URL is sent in an announcement.
Selecting Help or pressing F1 will display this page.
There are several different DX Cluster programs and the commands vary among them. Once you are connected to a cluster, you should type HELP in the transmit text box. On screen help will be displayed. There are many web sites with tutorials and documentation on the commands available to you.
View the AR-Cluster Manual.
View the DXSpider User Manual.
| HELP | Get help. Can usually be followed by a command for detailed help |
| ANN | Announce a message to the local users on the cluster |
| TALK | Send a message to someone else on the cluster |
| SH/CONFIG | Show who else is on |
| SH/DX | Show recent DX Spots |
| SH/FDX | Show Formatted DX. Makes older spots look like new ones. DX Monitor will load them automatically. Use SH/FDX/250 to get the latest 250 spots. |
| SH/WWV | Show recent WWV announcements |
| SET/PAGE 0 | Set unlimited page length. This is very important to prevent the program stopping to wait for the ENTER key, when hidden. |
| SET/NOTALK | Prevent other Telnet users from sending you private talk messages when your window is hidden. |
| SET/NODXSCTY | Eliminate the prefix appended to the comment which is redundant in DX Monitor and causes duplicate spots, one with the prefix in the comment and one without. |
Click here to report bugs or make suggestions.